
Can’t connect to this network WiFi error in Windows 11/10
[ad_1]
Several issues come up on Windows 11/10 computers, and one of the most frustrating ones is that Windows can’t connect to this network error. This error appears with no obvious indication of what’s causing it or how to fix it, making it tough to debug for many people. And we all know how vital our computer’s network connection is. So, if you’ve tried connecting your Windows PC to the network but it’s not working, we’ve got you covered. Most of the time, the cause of this problem can be traced to a few factors, which we’ll go over in this post, along with the best ways to fix Windows that can’t connect to this network error. Do stick with us to the end.

What should you know about Windows can’t connect to this network error?
When users try to connect to the internet, the Can’t click to this network message appears. Regardless of which choice you choose, the problem will render the internet inaccessible to you at times. In addition, the problem is almost often caused by incorrect network settings on your computer, and it could also be caused by a faulty network source or a problem with your network drivers.
However, using the approaches we’ll discuss in this article, it’s still something that can be fixed. But, before we get into that, here are the most likely causes of the error:
- Wrong Network Configuration
- Corrupt Update
- Buggy Drivers
- Modem/Router issues
Fix Windows can’t connect to this network
If you keep getting the Can’t connect to this network error whenever you try to access the internet on your computer, the first thing you should do is restart the computer as well as the router/modem and then try connecting to the network again. This can help you determine whether the problem is a minor one or one that will necessitate some computer tweaking to be resolved. If it doesn’t solve the problem, move these fixes.
- Update Windows/Uninstall Windows Update
- Run Network Troubleshooter
- Change Network Adapter Settings
- Update Network Driver
- Make sure your network source is near
- Forget Networks
- Make sure WiFi physical switch is on
- Flush DNS and Reset IP
- Disable IPv6
- Reset Network.
Now, let’s dive into discussing the fixes in full detail.
1. Update Windows
Sometimes, your computer may require an update to make it perform without glitches, and this could be the reason for Windows not being able to connect to this network. You are advised to always check for pending updates on their computer to fix issues like this. To check this:
Windows 11
- Press Windows + I keys to open Settings.
- Select Windows Updates.
- If there are any updates available, install them and try connecting your internet once again.
Windows 10
- Open Settings on your computer.
- Click on Updates & Security.
- Check for any available updates and install them.
If conflicting updates on your machine cause the issue, this should help you resolve it. Furthermore, if your computer’s network adapter isn’t compatible with the most recent Windows update, and you probably recently updated your computer before the problem appeared, you may need to remove Windows Update to resolve the Windows can’t connect to this network issue.
Read: PC won’t connect to internet but other devices will
2. Run Network Troubleshooter
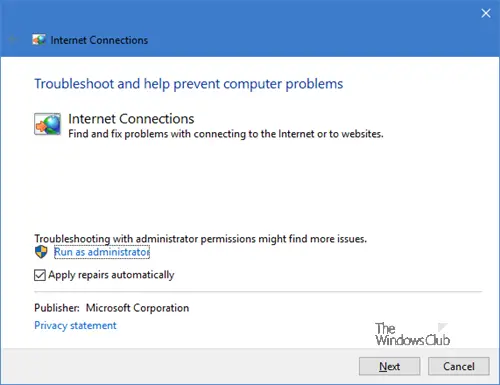
The Windows Network troubleshooter can be used to resolve general network issues. This operation will assist you in identifying the issue and guiding you on how to fix it.
In Windows 11/10 you can access the built-in Troubleshooters via the Settings Troubleshooters page. You can also run the Troubleshooters from the command line. Now as far as troubleshooters to fix Network-related issues are concerned, they are as follows:
- Shared Folders Troubleshooter
- Network Adapter Troubleshooter
- Internet Connections Troubleshooter
- Incoming Connections Troubleshooter
- Connection to Workplace using DirectAccess Troubleshooter.
However, the troubleshooter may not be able to identify all problems, which is why we’ve compiled the additional solutions we’ve discussed to assist you.
Fix: Network & Internet connection problems in Windows
3. Change Network Adapter Settings

Making a little tweak to the network adapter setting could help in fixing Windows can’t connect to this network, and here is how:
- Open Settings on your computer.
- Select Network and Internet.
- On the resulting page, click on Change adapter options.
- Right-click your wireless adapter and click on Properties.
- Hit Configure… and switch to the Advanced tab.
- Select 801.11d from the Property list and change the value to Enabled.
Fix: No internet, Secured error in Windows 11/10
4. Upgrade Network Driver
Drivers are the software that allows your computer to communicate with any connected devices – so you need to update your Network Drivers. Thus, if your network adapter is malfunctioning, you will undoubtedly encounter difficulties when attempting to connect to a network, and this could be the source of your computer’s problem.
To update Network drivers in Windows 11/10, you have the following methods:
- Using Windows Optional Update
- Download from official website
- Use driver update software
- Using Device Manager
This issue does not identify the root of the problem, but we must try out the various solutions, and one of the first things you should do is check out:
If you visit your manufacturer’s site to check for and download the latest driver, after downloading the file, do this:
- Open Device Manager.
- Click on your Network drivers menu to show the list.
- Select the network driver and right-click it.
- Hit Update driver and choose to select the driver from your file.
- Follow other on-screen instructions to finish the process.
After doing all these, restart your computer and try reconnecting with your network. If the issue started just after you’ve updated your network driver, then you should roll back the driver to the prior one.
Fix: Limited Network Connectivity message.
5. Make sure your network source is near
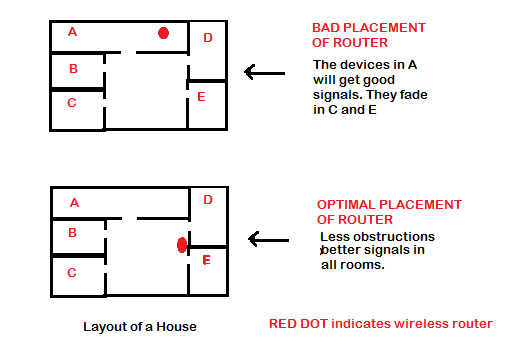
If you’re using a router to connect to the internet, you’ll need to place it as close to your computer as possible to establish a connection. Some people install their router far away from where they use their computer, which could be the source of your network problem. As a result, aim to locate your internet source as close as possible to where you will be utilizing it. Some basic suggestions can help increase WiFi Speed Signal strength and coverage area.
6. Forget Network
Windows computers store the WiFi profiles they’ve once connected with and forgetting some of these networks can help fix the issue you are facing while trying to connect to the internet if conflicting networks cause the problem.
Fix: Windows Connectivity issues with Hotspots and Wi-Fi adapters.
7. Make sure WiFi physical switch is on
Some PCs come with a physical WiFi switch, and if this isn’t on, you won’t be able to connect to the internet with WiFi. If you are using this kind of computer, try to toggle on the switch before joining your WiFi
Read: WiFi connected, but no internet access.
8. Flush DNS and reset IP
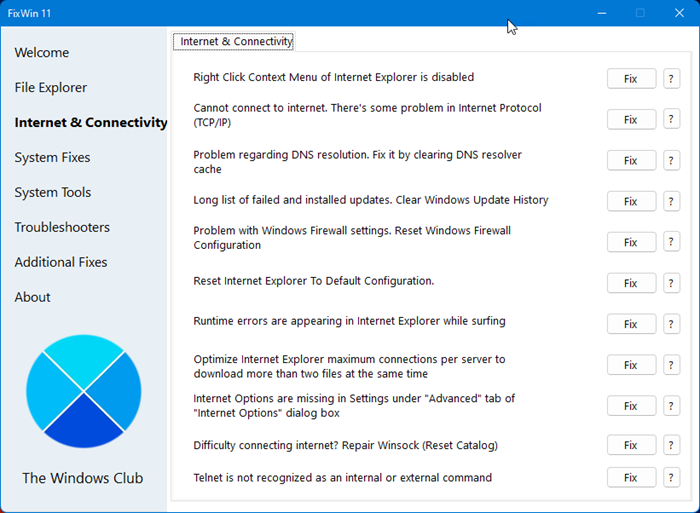
Corrupt DNS caches may also be the reason behind the inability to connect to the internet on your computer. This can, however, be fixed by releasing TCP/IP, flushing DNS, resetting Winsock, and resetting Proxy. So you can try making use of this method to fix the network issue on your computer by
You may use our FixWin 11 to carry out these tasks with a click!
You can then try connecting your network again and see if the issue has been fixed or not. If not, try the next solution.
9. Disable IPv6
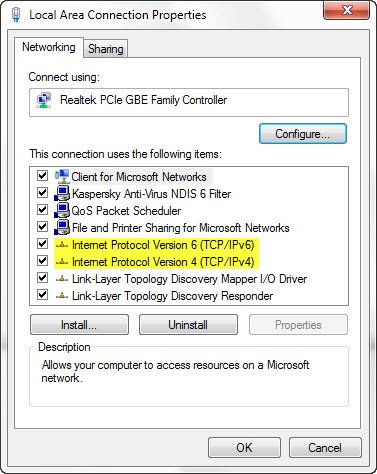
The IPv6 isn’t always needed on PCs, and disabling it can help resolve the network issue you are getting when trying to connect your computer. So, to disable IPv6, do this:
- Open the System tray and right-click on the Network icon.
- From the resulting menu, click on Open Network and Sharing Center.
- Then click on Change adapter settings.
- On the Network adapters page, right-click on the network you are having issues with and select Properties.
- Navigate to Internet Protocol Version 6 and uncheck the box.
- Select OK to save the changes and restart your computer afterward.
10. Reset Network

Another effective way to fix network issues in Windows computers is to reset the network. Simply follow the link to perform the troubleshooting and try reconnecting to your internet source.
Why does my computer keep saying I can’t connect to this network?
The Windows can’t connect to this network problem is usually caused by network adapter issues, and your computer may need to have its adapter settings tweaked or its drivers updated. However, a malfunctioning internet source could be the source of the problem, which can be confirmed by testing the router/modem with another device. It is the former if it works, and if it does not, you should try another internet provider.
Does running a Network troubleshooter fix Windows can’t connect to this network?
Running network troubleshooting might help you figure out if there are any difficulties with your computer and how to fix them. However, there are some difficulties that the network troubleshooter will be unable to detect or resolve, which is why we’ve compiled a list of more detailed ways for determining network issues on your computer.
[ad_2]
Source link


